Beaded Pendant Chloe with DropDuo and StormDuo beads – free tutorial by Anna Rita Fabiani
Original round shaped pendant with DropDuo and StormDuo beads will finish your look. It can be a necklace or a brooch just as you wish. Shining glass stone rivoli in the middle catches attention and adds some luxury into your day 💎 Just follow this gorgeous rivoli bezel tutorial with 4mm round beads and have fun 💜

1. 14mm rivoli - click here
2. 8pcs 4mm beads - click here
3. 8pcs Superduo - click here
4. 16pcs DropDuo - click here
5. 16pcs StormDuo - click here
7. Miyuki seed beads 11/0 - click here
8. Miyuki seed beads 15/0 - click here
9. Needle and thread for weaving - click here
This tutorial is for personal use. Distribution of this tutorial or part of it is prohibited. You are welcome the quote from the author Anna Rita Fabiani with the indication of the website www.semplicicreazioni.com
1. Start by putting on the string 8 x 4mm pearls alternating with 8 x 11/0 seed beads. Close in a circle and lock with a knot.
Go through the first 11/0 with the needle and add another 5 x 11/0 seed beads, go through the next 11/0 after the 4mm bead. Repeat these steps for the whole round.

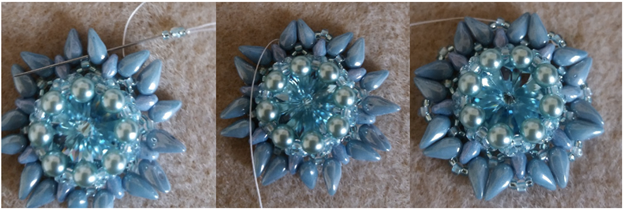
At the end of the round, go to the central bead of the first headband, as shown in the photo above.

Now add 3 x 11/0 seed beads and pass through the central bead of the next headband. Repeat these steps for the whole round and, before tightening the work, put the Rivoli upside down.

Bring yourself to the central bead of the first headband. Add an 8/0 and go through the center bead of the next headband.

Repeat the steps for the whole circle ... your rivoli will be perfectly set.
2. Take the first "cross" bead and add an 11/0, a Superduo, a 11/0. Step into the next "cross" bead. Repeat for the whole round, your work will look like in the photo.

At the end of the lap you will have to take you out of the 11/0 which is after the superduo.
3. Put on the thread a 15/0, an 11/0, a 15/0 and pass the following group of beads (11/0, superduo, 11/0). Repeat for the whole round; at the end of the tour, take the first 11/0.

4. Now add a DropDuo and go to the top hole of the Superduo; put another DropDuo and go to 11/0. Repeat the steps for the whole round.

5. At the end of the turn, pass through the lower hole of the first DropDuo inserted. Add a 15/0, an 11/0, a 15/0 and move on to the DropDuo, 11/0 and the following DropDuo.

At the end of the tour you will have made 6 picots at work. Bring yourself out of the tip of the first picot.
6. Put an 11/0, a StormDuo on the wire (see the photo for the StormDuo's side) and pass in the tip of the two DropDuo.

Then add a StormDuo, an 11/0 and pass the tip of the next picot. Repeat the steps for the whole round.

At the end of the tour, take yourself out of the 11/0 which is before the StormDuo.
7. Put on the thread 5 15/0 seed beads and pass through the top hole of the StormDuo; add 5 more 15/0 seed beads and passed into the first 11/0.

Add a 15/0 and move on to the next 11/0.

8. At the end of the tour, go to the first group of rocailles; add a 15/0, a 11/0, an 8/0, an 11/0, a 15/0 and go through the next group of beads.

Go out of 11/0 and add two 15/0, one 11/0, one 8/0, one 11/0, two 15/0 and pass into 11/0 of the base round.

Pull the thread well and add two 15/0, pass through 11/0, 8/0 and 11/0. Put two more 15/0 and switch to 11/0 and 15/0 that are on the StormDuo.

Repeat the steps described for the rest of the round.

9. This step is optional: go through the previously added seed beads, skipping the 8/0. In this way the 8/0 will remain in evidence.

Disperse the thread in the work and cut off the excess. In an 8/0 add a ring to which you will add the necklace of your choice.

Hope to see your versions soon.
For any doubt or clarification you can contact me at the email neka83@hotmail.it or look for me on facebook https://www.facebook.com/semplicicreazioni
Anna Rita Fabiani


Leave a comment